WordPress Multisite is an advanced feature of WordPress. It enables us to set up multiple blogs and manage from the same dashboard. This post helps you to setup multisite and activate WordPress MultiSite subdomain option. The Multisite feature can be activated by checking the multisite option while installing the WP. Or if you missed checking the multisite option while installing do can manually do the multisite activation.

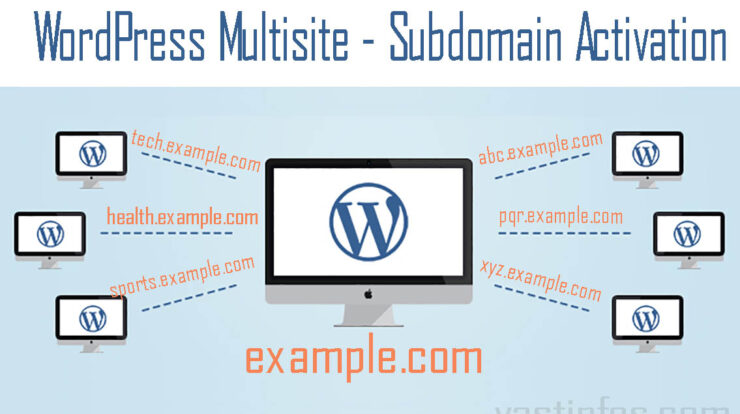
Using WordPress Multisite option you can setup and run your multiple wp blogs. These blogs can be configured as sub-blogs using the subdomains. Eg: tech.vastinfos.com, education.vastinfos.com, sports.vastinfos.com etc.
WordPress Multisite can be configured by using two options,
- Using the subdirectory option
- Using the subdomain option
If you have activated the multisite feature, by default the configuration available is using subdirectory option.
Switching to the multisite using subdomain is not directly possible. Since there is no direct option available for activating the subdomain option. The only available technique is by modifying the WP-Config file in your WordPress file directory.
So in this post, I’m going to show how to activate the subdomain option easily. Just by modifying a single word in the WP-config file.
How to activate WordPress Multisite Option manually?
- Go to WordPress FileExplorer via FTP/Cpanel
- Open wp-config.php file for editing,
- Add the below code
/* Multisite */
define( ‘WP_ALLOW_MULTISITE’, true );
- And save the modified wp-config.php file
- That’s it
Now, re-login WordPress. You will find the Network admin option.
Or in my sites option, you can find the Network admin option
- Go to Sites under the network admin
- Click on Add New

- Fill the details and create the new site, using subdirectory
If you can’t find the add new site option make the necessary configuration under settings, as below
- Go to Settings option under the Network admin

- Select Network Setup
- In the network setup, you will find the codes to be added for modifications.
How to Activate WordPress MultiSite Subdomain Option?
As seen in above screenshots, by default for multisite subdirectory option is enabled. If you need to activate the multisite using subdomain. You have to modify the wp-config.php file.
- define(‘SUBDOMAIN_INSTALL’, false); – indicate subdomain option is disabled
- define(‘SUBDOMAIN_INSTALL’, true); – indicate subdomain option is enabled
So you have to find the define(‘SUBDOMAIN_INSTALL’ and set it to true.
The final code for WordPress multisite with subdomain option may look like,
/* Multisite */
define( ‘WP_ALLOW_MULTISITE’, true );
define(‘MULTISITE’, true);
define(‘SUBDOMAIN_INSTALL’, true);
define(‘DOMAIN_CURRENT_SITE’, ‘example.com’);
define(‘PATH_CURRENT_SITE’, ‘/’);
define(‘SITE_ID_CURRENT_SITE’, 1);
define(‘BLOG_ID_CURRENT_SITE’, 1);
example.com should be replaced with your domain name.
Now you will find the subdomain option for your WordPress multisite is activated.

And you are done now enjoy creating sub blogs. Manage your sub blogs from the network. You can share themes, plugins etc using the multisite network.
- Refer https://codex.wordpress.org/Create_A_Network for more detailed information on creating a network of wp blogs.
If your domain name is example.com
Then you can create sub-blogs on various niches. You can point subdomains of your main blog to these blogs.
Eg:
- Tech Blog – http://tech.example.com
- NewsBlog – http://news.example.com
- SportsBlog – http://sports.example.com
- Health Blog – http://health.example.com
Enjoy blogging multiple WordPress blogs. Easily manage all under a single dashboard.
Tags:
Activate WordPress MultiSite Subdomain tutorial steps video, subdomain wp multisite, wordpress multisite subdomain parking, subblogs with subdomains in wordpress, wp blog network creations, wordpress niche blog network tutorial,


